Table of Contents
ToggleInstalling patio pavers might seem intimidating at first, but it’s one of the most rewarding DIY projects you can tackle. With proper preparation, the right materials, and a methodical approach, you can transform your backyard into a functional outdoor living space. This guide walks you through each step, from laying the foundation to setting the final paver, so you understand not just the “how,” but the “why” behind each phase. Whether you’re planning a small seating area or a full patio, these fundamentals apply.
Key Takeaways
- Proper foundation preparation—including a 4-inch compacted gravel base and 1 inch of leveling sand—is essential to prevent shifting, cracking, and patio failures over time.
- Installing patio pavers requires specific tools (shovel, level, rubber mallet, wet saw) and materials (landscape fabric, polymeric sand, edging) that should be gathered before you start the project.
- Accurate marking and slope calculation (1/8-inch per foot away from your house) ensure proper water drainage and prevent pooling on your finished patio.
- When installing patio pavers, check level frequently in multiple directions and maintain consistent 1/8 to 1/4-inch joint widths using spacers or straightedges for a professional appearance.
- Polymeric sand hardens when activated with water, locking pavers in place and suppressing weeds—apply it carefully after all pavers are set, then allow 24–48 hours for curing before heavy use.
What You’ll Need Before You Start
Before breaking ground, gather your tools and materials. You’ll need a shovel (both flat and pointed tips work best), a wheelbarrow, a level (a 4-foot model is ideal for checking patio sections), a tape measure, a rubber mallet for tapping pavers into place, and a landscape rake. A circular saw or wet saw comes in handy if you need to cut pavers to fit edges: a wet saw produces cleaner cuts with less dust and breakage.
For materials, order patio pavers (concrete, clay, or stone, calculate square footage and add 10% for waste and future repairs), landscape fabric to suppress weeds, crushed stone or gravel for the base layer (typically 4 inches), polymeric sand for joints (stays in place better than regular sand), and concrete border or edging to contain the base material and prevent pavers from shifting. Most jurisdictions don’t require permits for patios under 200 square feet on residential property, but check your local code.
Personal protective equipment matters here: wear safety glasses, work gloves, dust masks when cutting or grinding, and ear protection near loud equipment. Long pants and closed-toe boots protect your feet from dropped pavers and sharp edges.
Preparing Your Patio Foundation
Foundation prep separates a patio that lasts from one that shifts and cracks within two seasons. This isn’t glamorous work, but it’s non-negotiable.
Marking and Measuring Your Space
First, define your patio footprint with chalk lines or string. Measure twice. Use the 3-4-5 triangle method to ensure corners are square: measure 3 feet along one edge, 4 feet along an adjacent edge, then check that the diagonal is 5 feet. If it’s not, adjust until it is. Mark the area using stakes and string, then spray-paint the outline so you can see what you’re excavating. Account for a 1/8-inch slope per foot away from your house to shed water and prevent pooling, so a 12-foot patio slopes down 1.5 inches from back to front.
Excavation and Leveling
Excavate to a depth that accounts for your base layer, sand layer, and paver thickness. Most patios use a 4-inch gravel base plus 1 inch of leveling sand plus your paver depth (usually 2–2.5 inches for standard pavers). So you’re typically digging 7–8 inches deep. Remove grass and topsoil first, a sod cutter rents for about $60 a day and saves your back. Once the area is excavated, use your level frequently. Compact the soil with a hand tamper or plate compactor (a powered plate compactor rents for $50–75 per day and does the job faster, especially for areas over 200 square feet). Loose soil will settle later, and pavers will shift. Install landscape edging along the perimeter to contain your base materials and keep pavers from spreading outward.
Laying the Base and Sand Layer
Your base is where most patio failures originate. A solid 4-inch compacted gravel base is the industry standard, it provides drainage and support. Spread the crushed stone evenly across your excavated area, then compact it in 2-inch lifts (compact once, add another 2 inches, compact again). This prevents settling. Check grade and slope with your level as you go: the base should already slope toward your drainage direction.
Once the base is solid, spread 1 inch of leveling sand over the top. Don’t use beach sand, use coarse concrete sand, which compacts better and doesn’t shift as easily. Rake it smooth and check your slope again. Many DIYers skip full compaction of the sand layer, thinking they’ll hand-tamp as they set pavers. That’s a recipe for rocking pavers and uneven surfaces. Compact the sand layer lightly with a plate compactor or hand tamper, keeping the slope consistent. Use your level or a long straightedge (a 2×4 works) to verify flatness. If you’re working alone, paver patio costs and labor rates vary significantly by region, but expect that professional crews spend time on base prep for good reason.
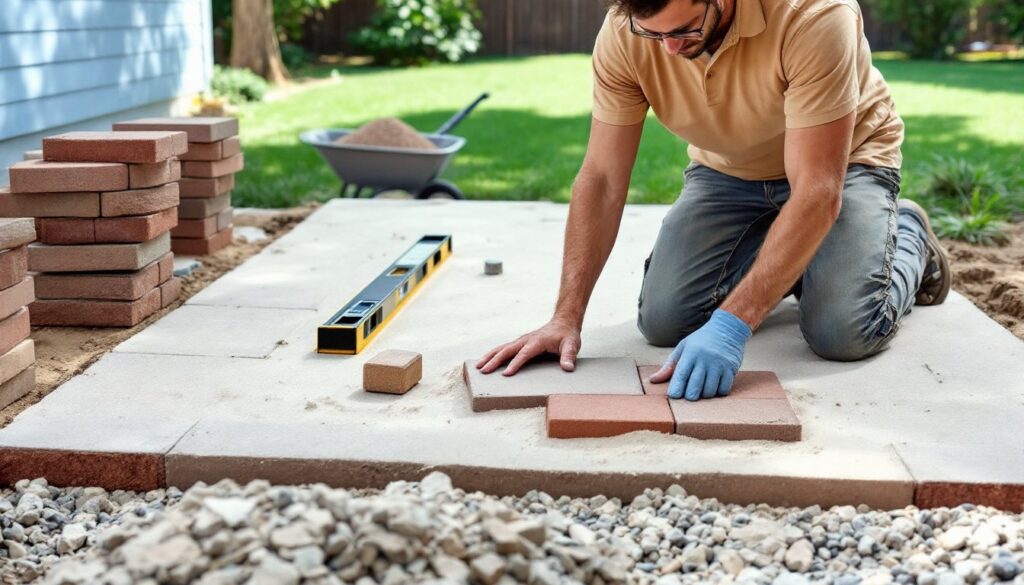
Installing Your Pavers
This is where your patio comes to life. Set pavers firmly into the sand using a rubber mallet, strike the face gently but decisively. Check level frequently: a high paver will rock when someone walks on it, and a low one collects water.
Setting Patterns and Alignment
Common patterns include running bond (offset rows, like brickwork), herringbone (45-degree angles), and simple grid (all pavers aligned). Running bond and herringbone are more forgiving if your patio isn’t a perfect rectangle, they hide slightly off-size cuts better. Herringbone demands tighter cuts and more waste, so factor that into your paver order.
Lay pavers from one corner, working toward the opposite corner. Maintain consistent joint widths (typically 1/8 to 1/4 inch) by laying spacers or using a straightedge. As you work, classic DIY renovation guides and expert project advice emphasize checking level in multiple directions, lengthwise, widthwise, and diagonally across groups of pavers. Stubborn pavers that won’t settle can be tapped lower, or you can remove them and add a touch more sand underneath. If you need to cut pavers, measure from both directions (cut from the outside edge inward, and number pieces so you don’t lose track). Use your wet saw or circular saw with a concrete blade, wear goggles and a dust mask. Cut pavers are weaker at edges, so place them where they’ll bear less load or be less visible.
Once all pavers are set, sweep polymeric sand into the joints. This sand hardens slightly when wet, locking pavers in place and preventing weeds. Sweep carefully so sand fills joints completely but doesn’t pile on top of pavers. Spray the entire patio lightly with water to activate the polymeric sand, then let it cure per the manufacturer’s instructions, usually 24–48 hours before heavy use. Don’t oversaturate: that can wash sand out of joints or cause discoloration.